
Outdoor Patio Lighting Design: Planning Layouts for Summer Entertaining and Year-Round Use
Core Principles of Outdoor Patio Lighting Design
.jpg)
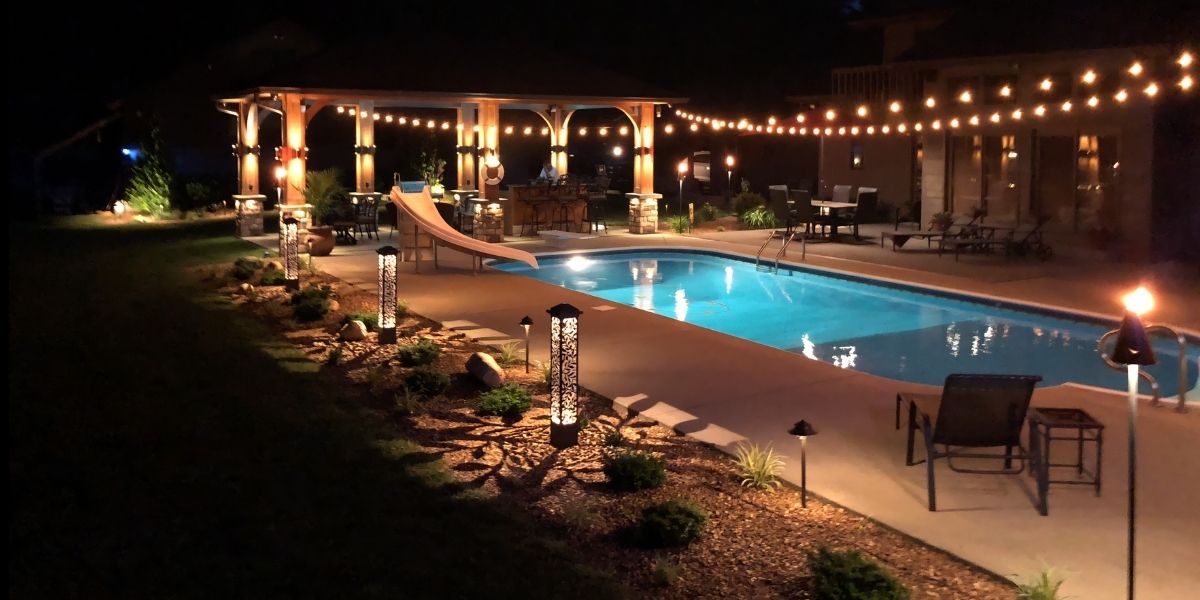
Why do so many patios feel flat at night, even after a serious investment in furniture and landscaping? The issue is almost always the lighting, one overhead fixture, or a few temporary lights added as an afterthought. A single bright source can't do what a layered system does. It leaves the space looking unfinished after dark, no matter how good it looks in daylight.
How to Design Outdoor Patio Lighting
- Layer three types of light — ambient (general glow), task (functional zones), and accent (feature highlights)
- Choose warm LEDs — 2700K–3000K color temperature for a welcoming, natural look
- Match fixtures to zones — path lights for walkways, uplights for trees, sconces for walls, step lights for safety
- Use low-voltage (12V) systems where possible for safer, easier installation
- Select outdoor-rated fixtures — minimum IP65 for exposed areas
- Plan before you install — map your zones, runs, and transformer placement first
A poorly lit patio costs you on two fronts. Dark corners give intruders cover, and a property that looks unfinished at night undercuts the work you put in everywhere else. Good exterior lighting is also one of the improvements buyers and appraisers notice, and it's regularly cited among the outdoor upgrades with strong returns at resale.
The fix is to treat lighting as part of the property's infrastructure, not a decorative afterthought. A layered, professionally installed system removes the dark hiding spots that concern most homeowners, keeps the space looking polished year-round with little ongoing effort, and adds to the property's appeal when it comes time to sell.
I'm Bill Frey, President of Illuminating Design Inc. For over 20 years I've designed and installed outdoor lighting across metro Atlanta, and I've watched the right plan turn an unused patio into the part of the property people actually want to be in. The principles in this guide are what hold up across thousands of real installations.
This guide outlines the spatial layout principles, architectural layering strategies, and technical fixture specifications for low-voltage patio and landscape lighting systems. For properties seeking permanent, flush-mounted roofline tracks for holiday themes or architectural border accenting, view our dedicated permanent trim lighting guide.

Our Artistic Approach to Patio Lighting Design
At Illuminating Design, our creative philosophy treats light as an artistic medium. We don't just illuminate a space; we sculpt it. When designing a patio lighting system, our goal is to create visual balance by playing with light and shadow. A patio with uniform, bright light feels sterile and clinical. Conversely, a patio with too many dark pockets feels uninviting and unsafe.
Achieving the perfect balance requires architectural integration. Your lighting should complement the lines of your home, the textures of your hardscaping, and the natural shapes of your landscaping. Whether you reside in Buckhead, Alpharetta, or Sandy Springs, a custom-designed system must respect the unique architecture of your property.
Our smart-control systems let us program custom scenes, adjust brightness, and dial in specific color temperatures to match the mood of any occasion everyday warm white, dimmed late-night ambiance, or something bolder for a party.
.jpg)
The Three-Layer Approach to Outdoor Patio Lighting Design
To build a truly functional and atmospheric patio, we rely on the classic three-layer lighting principle. This layered approach ensures your outdoor space reads as a cohesive "outdoor room" rather than a flat, dark void.
- Ambient Lighting (The Foundation): This is the general background glow that allows people to navigate the space safely. Instead of relying on a single, blinding floodlight, we distribute ambient light across multiple softer sources such as wall-mounted sconces and permanent trim lighting to create a warm, glare-free environment aligned with responsible outdoor lighting guidelines.
- Task Lighting (The Functional Layer): Task lighting focuses on specific areas where activities take place. This includes illuminating outdoor kitchens, grilling stations, and dining tables. For instance, a grill station benefits from focused downlighting of at least 300 lumens, while steps and transitions require low-voltage step lights to ensure safe footing.
- Accent Lighting (The Dramatic Layer): Accent lighting adds depth, drama, and visual interest by highlighting specific architectural and landscape features. By utilizing well lights at the base of mature trees or uplights on textured stone walls, we draw the eye to the perimeter of the property, making the entire yard feel larger and more cohesive.
By integrating these layering techniques, we can elevate your property's aesthetic while providing essential safety. To explore the artistic possibilities of this approach, check out our guide on Professional Outdoor Lighting Design.
Selecting the Right Fixtures and Haven Lighting Technology
Selecting the right fixtures is critical for both durability and aesthetic success. For high-end residential and commercial properties in metro Atlanta, we recommend solid brass or copper fixtures because they naturally patina over time and resist the harsh Georgia humidity.
When planning your layout, it helps to understand how different fixtures perform. Here is a quick comparison of the most common options:
Fixture TypeBest-Use ScenarioInstallation DifficultyRelative CostLow-Voltage Deck/Step LightsSteps, deck posts, and retaining walls for safety and subtle perimeter glow.Moderate (requires routing low-voltage wire)ModeratePermanent Trim LightingSeamlessly integrated roofline and architectural lighting for year-round ambient glow.High (requires professional installation)PremiumRecessed Hardscape FixturesUnder-cap stone walls, steps, and outdoor kitchen counters.High (best planned during construction)Premium
For pathways, we install low-voltage path lights (100–200 lumens each) spaced 5 to 8 feet apart in a staggered pattern to avoid a commercial "runway" effect. For trees and architectural columns, we use adjustable uplights to cast beautiful, textured shadows. For steps and slick pool decks, recessed step lights placed every 3 to 4 feet provide crucial safety.
uplights on textured stone walls
To see how these fixtures integrate into a broader property plan, read more about our approach to Landscape Lighting.
Essential Bulb Specifications: Kelvin, CRI, and LED Efficiency
The technical specifications of your bulbs will make or break your final look. Three key metrics dictate how your patio looks and functions:
- Color Temperature (Kelvin Scale): For residential gathering spaces, warm white tones are essential. We recommend 2700K to 3000K for most outdoor fixtures. Tones in the 2200K to 2400K range mimic cozy candlelight, which is perfect for relaxed seating areas. Anything above 3500K looks clinical and harsh in a residential setting.
- Color Rendering Index (CRI): CRI measures how accurately a light source reveals the true colors of objects compared to natural daylight (measured on a 100-point scale). Cheap LED bulbs often have a CRI of 70 to 80, rendering plant foliage and stone flat and ashy. We use high-quality LEDs with a CRI of 90 or higher to ensure your red maples, green lawns, and natural stone surfaces look vibrant and true-to-life at night.
- LED Efficiency: Transitioning to LED technology is highly beneficial. Quality LEDs use roughly 75–85% less energy than incandescent bulbs and last far longer 25,000+ hours versus the 1,000 to 2,000 typical of incandescent.
With Haven Lighting's smart controls, we can program these specifications to adjust automatically. You can dim your system to 30-50% output late at night, which lowers energy consumption and significantly extends the lifespan of your system.
Implementing and Maintaining Your Custom Patio Lighting System
A successful lighting system requires a clear installation strategy and professional execution. While some basic decorative elements can be handled as DIY projects, a permanent, high-performance system requires specialized planning to withstand the elements and function reliably for years to come.
Step-by-Step Planning for Your Outdoor Patio Lighting Design
.jpg)
To ensure your system performs flawlessly, we follow a rigorous site-planning and layout design process. If you are considering a DIY approach or want to understand our professional process, here are the essential steps for a successful patio lighting installation:
- Map Your Zones: Walk your property at dusk and identify key areas: high-traffic walkways, active dining zones, and architectural focal points.
- Calculate Your Load: Determine the total wattage of your planned fixtures. A standard low-voltage transformer can comfortably power 10 to 15 LED fixtures on a single run, but you must keep the total load under 80% of the transformer's capacity.
- Account for Voltage Drop: In low-voltage (12V) systems, voltage drops as the wire runs further from the transformer. We use a digital voltmeter during installation to ensure every fixture receives steady power.
- Position the Transformer: Mount your weather-rated transformer at least 12 inches above the ground near an outdoor GFCI outlet.
- Bury and Protect Wires: Dig trenches at least 6 inches deep along landscape beds to protect your low-voltage cables from lawnmowers and edgers.
Avoiding Common Installation Mistakes and Ensuring Safety
When installing outdoor lighting, small mistakes can lead to system failures or safety hazards. Here are the most common pitfalls we avoid:
- Poor Water Drainage: Landscape and permanent trim connections must be oriented to prevent water from pooling. We ensure all connections use watertight, direct-burial connectors to prevent moisture intrusion.
- Overloading Circuits: Ensure your outdoor GFCI outlet is on a dedicated circuit that isn't shared with high-draw indoor appliances like hair dryers or microwaves.
- Mixing Voltages: Never mix 12V low-voltage landscape wiring with 120V line-voltage systems in the same conduit. Any 120V line-voltage work—such as installing recessed ceiling fixtures—requires a licensed electrician and building permits to comply with local codes.
If you want to avoid the headache of complex wiring and code compliance, our team handles the entire process from start to finish. Explore our complete range of professional lighting installation services.
Long-Term Maintenance and Weatherproofing for Atlanta Climates
The climate in metro Atlanta—from the humid summers in Roswell and Alpharetta to the heavy spring rain in Dunwoody and Brookhaven—demands robust weatherproofing.
All exposed fixtures must carry a minimum rating of IP65 (dust-tight and protected against water jets). For coastal or lakeside areas, marine-grade finishes are highly recommended to prevent corrosion.
To keep your system performing beautifully, we recommend a simple annual maintenance routine:
- Clean the Lenses: Wipe down fixture lenses with a soft cloth and mild soap to remove pollen, dirt, and mineral deposits. This simple step can restore 20% to 30% of lost light output.
- Check the Alignment: Over time, lawn care and soil shifting can knock fixtures out of alignment. Re-aim spotlights and path lights to keep the light focused where it belongs.
- Inspect the Connections: Check wire connections annually for signs of corrosion or wear.
At Illuminating Design, we take the hassle out of upkeep. We offer worry-free annual maintenance programs to ensure your system continues to look as spectacular as the day it was installed. Learn more about our specialized Landscape Lighting Services.
Key Takeaways:
Transitioning an outdoor living environment into a safe, multi-functional extension of your home requires moving past singular overhead fixtures to embrace a structured layout philosophy.
- Implement Three-Layer Balancing: Establish a cohesive background environment by blending ambient glow (sconces or trim tracks) with functional task lighting for cooking zones and directional accent lighting to define property boundaries.
- Prioritize Structural Hardware: Opt for solid brass or copper low-voltage fixtures rather than temporary alternatives; they naturally patina over time and easily endure intense humidity and seasonal downpours.
- Enforce Strict Electrical Precision: Protect system integrity by calculating total wattage loads below 80% of your weather-rated transformer's capacity and burying low-voltage runs at least 6 inches deep.
- Execute Regular Upkeep Routines: Maximize system efficiency and reclaim 20% to 30% of obscured light output by cleaning lenses annually to strip away pollen, dirt, and mineral deposits.
A poorly balanced low-voltage system shows it flickering from voltage drops, corrosion from moisture, and uneven pools of light and shadow. A patio that looks effortless at night is the result of disciplined planning and clean installation. Contact our team for a custom rendering of your property.


Bringing Your Vision to Light
Projects Completed
Our team has successfully completed over 3,000 installations, ensuring each project is tailored to meet the client's unique needs.

Years of Experience
With over 20 years in the industry, our expertise and commitment to quality shine through in every project we undertake.
Lights Installed
We have illuminated spaces with over 10,000,000 lights, bringing creativity and innovation to every design.


.avif)